Sunday, March 30, 2014

'Shiny Shit Sells' and Other Pearls of Wisdom From The Workshop


Josh Smith presents a bench to classmates at the College of the Redwoods Fine Woodworking program
You hear these little nuggets around the shop from time to time, whether in a lecture, a ‘walk-around’ or just in conversation.
And some of them are just begging to be written down and shared.
I guess the journalist in me is still alive and well because I always have to record them. 
And now I think I’ll share them with you all.
Enjoy!

“I have a friend who is a contractor. He makes money. I have a friend who is a cabinetmaker. He makes money. I am an artisan.” – Ejler Hjorth-Westh
“I used to make money, then I came to this school.” – Ejler
“When you walk into a room that is full of loudness, it is the quiet piece that gives you refuge. A loud piece essentially says ‘stay away.’” – Ejler
“Learn to love the 1%. People are lovable everywhere.” – Ejler
“I see the beauty of the wood, but I still want it to be what I want it to be.” – Ejler during a lecture on applying finishes
‘Seek the inner beauty of the wood, and be wary of overly vulgar glassiness, which is a real temptation.” – Ejler
“Shiny shit sells.” - Ejler
“It’s easy to measure a gap. You can’t put a measurement on taking a risk and a successful project,” – David Welter quoting Krenov
“The entire time the thought of carving out that seat scared me the most. So that’s where I started.” – Welter
“Krenov used to always say there’s no ego in this work. But there was never a more willful man that walked this Earth. That always puzzled me.” – Welter
“The piece reflects the attitude in which it was created.” – Welter
“As JK said: Hand tools give us the fingerprint on the work. Machines give us the accuracy, the precision.” – Yeung Chan
“Overcoming what you already believe – I think that is part of the learning process.” – Tim, while presenting his table to classmates
“A curve should be like a blade of grass in the wind. Where it is thin it bends a little more and there is motion and movement.” – Welter describing Krenov’s view on curved lines in a cabinet.
“There’s a tendency to confuse sharpness with exactness.” – Welter
‘Death alone can prevent you from making mistakes.” – Krenov
“It’s fun. It’s those little touches that takes this work a cut above the others.” – Jim Budlong on why we make handmade catches and latches
“It became more important for the cabinet to be beautiful. And in the end people will put into it what goes into it.” – JK on a student debating whether to make a cabinet 5’ deep or 7’
“When does something rich, ample and voluminous become just fat?” – Krenov
“You can’t have too much wood. It’s impossible. Unless you don’t plan on living long.” – Krenov
“He saw it, and it wasn’t. He saw it again, and it was.” – Krenov describing an incident where Malmsten told a student something wasn’t quite right, then came back after lunch and thought it was perfect (though nothing had changed).
“A chair is a negative imprint of the body. When it is empty, there you were a little while ago. It’s a lovely thing.” – Ejler
“Sometimes it is the absence of a person in the chair that actually makes the chair. And we must recognize that a chair sits empty most of its life.” – Ejler
“Your chair won’t last forever but it needs to last forever enough.” – Ejler
“It’s good to work cheap, once in a while, for the right reasons.” - Ejler
“Sometimes almost perfect is perfect enough.” – Laura Mays
“Let’s keep this school going. It’s the last thing in the world that means anything. It’s all going to shit.” Brian Newell

Sunday, March 16, 2014

How Ripping Something Apart Then Putting it Back Together Can Make it Stronger


We’ve learned a number of different techniques for bending wood, each method with its own strengths and weaknesses and contexts and purposes.
There’s coopering, which can be done one of two ways. You can either plane a curve into a solid piece of wood, or you can cut a solid piece into staves, bevel an angle on the edge of each one, then rejoin the staves together to create a faceted curve which can then be planed smooth.
Then there is steam bending, which is often used in chair making.
Another method involves the veneering of thin sheets, or plys, of wood on top of one another in alternating grain directions, over a form to create a bent core, which is then laminated with a shop-sawn veneer to create a beautiful outer surface.
You can also simply saw a curve out of solid wood when thick enough stock is available.
But recently I’ve been experimenting with bent laminating – a technique used often in chair making.
I had no pictures of my bent lam, so here is one courtesy of thecraftsmanspath.com showing a rocking-chair rocker glue-up.
Here’s how it works: You saw a piece of solid wood into thin strips (we call this 're-sawing'), then run them across a jointer or through a planer to remove the saw marks.
Then, using a form you created that mimics the curve you want to achieve, you re-assemble those layers in their original order, apply glue to the joining surfaces, bend the whole unit around the form and clamp up like crazy!
Because the wood is sawn into such thin strips, it is able to form curves that the solid piece probably never would. 
A few hours after the glue up you remove the clamps and presto, you have a piece bent to the curve you need, ready to be shaped into a chair or table leg, arm or crest rail without the waste that would have occurred if you’d sawn it from solid wood.
To steam bend it, you would have to subject the wood to heat, water and steam, running the risk of over stressing the wood and causing breakage.
But with bent lamination there is very little waste, incredible bends can be achieved, and the wood, once re-assembled, often shows little or no evidence that is has been cut into slices and glued back together again.
I used the technique to create the lumbar rails on my chairs and the process has gotten me thinking about parallels in my own life.
I resonate with the concept of something that is whole, complete, strong and integral, being dismantled into smaller, weaker pieces. That happened to me as it happens to many of us -- the result of circumstances, life, mistake and brokenness. It was life.
But the point is that though the dismantling, the cutting up, was painful and unexpected and resulted in weakness, strength was able to come out of it.
The individual pieces were shaped, smoothed, and prepared through that process for future work.
And once they were put back together again, some imperfections were removed, strength and integrity were added and the end result, I hope, is a piece that is stronger than it was before that process began.
And the process didn’t just add strength it also provided new traits. Like the re-sawn wood, I can now bend in new directions that pride and ego and stubbornness simply wouldn’t allow before.
In high school I worked out in the weight room almost every day, desperately trying to not be the skinny, gangly 10th grader I was. A teacher who worked out with us and helped with our routines and described weight-lifting as the process of tearing, breaking and damaging your muscles a little bit every time you lifted a dumbbell. You were forcing those muscle fibres to grow back stronger, to knit together more closely. Strength and muscle were the result of that process.
I think what I’m describing here is the same process but it’s not the muscles that are growing back stronger, it’s the heart. With wood, the dismantling, re-shaping and re-assembly results in a stronger piece in a brand new shape.
I think, I hope, that somehow that same process has taken place in my heart.

Thursday, March 13, 2014

Hickory bark vs. Danish cord -- what do you think looks better?

As you might recall, I'm building two chairs this semester (scroll down a couple of blogs to see a pic or click here and go to the bottom.)

The process is coming along and I'm now working on connecting the glued-up fronts and backs of the chairs, with seat rails and stretchers. This is what they currently look like:
I'm starting to think about the type of seat material I want to use, and I'm looking at two main options: Danish cord and hickory bark, and I need your input.

Danish cord is a paper based product used in many Danish or Scandinavian chair designs. It's durable and sustainable and has a low-key, subtle look that draws attention to the furniture, not the seat.

Hickory bark (also called 'splint') is also sustainable, subtle, and arguably could better compliment the wood of the chair frame, since it is also made from wood. It is typically used on 'country chairs' in the Shaker, or Windsor style but also occasionally in Danish-type designs - though not commonly.

I like them both. Ben, a second-year student who built the Vidar chairs last year, used Danish cord and it looks great. I'm considering hickory because it's a small way to put my fingerprint on the design and make it my own.

One other thing to consider: Ben's chairs are oak, which is quite brown, and he used white Danish cord. My chairs are ash, which is much lighter than oak, and the splint would be brown, which would mean the colour scheme from Ben's chairs would be reversed on mine. Which could be kind of cool.

Enough talk, here are the options. Would love your feedback!

Here is Danish cord on a chair by Caleb James (http://kapeldesigns.blogspot.com/)
Here is a stool with hickory splint seat by Brian Boggs (http://www.brianboggschairmakers.com/category/chairmakers_journal/)

Saturday, March 1, 2014

Video: How to make the Vidar's Chair crest-rail (with a surprise ending)

I've been working away on my Vidar's chairs and making good progress. Yesterday was a good day, as I glued up the backs of both chairs -- the first glue-up in this build. Pretty exciting! Next I need to make the crest rails and the back splats. The crest rail construction process is pretty complicated and difficult to explain, so I put together this little video after successfully cutting one out yesterday.
Check it out!

Sunday, February 9, 2014

A conversation with James Krenov's daughter


James Krenov is pictured here as a child in Alaska, floating one of the toy boats that launched his woodworking endeavors.
On Friday night I was selling tickets and helping manage the food table at the formal reception for our College of the Redwoods fine woodworking winter exhibition.
It was packed with people and the event seemed to be a big success.
A lady was purchasing a ticket from me, and while filling it out, she joked “with a last name like mine, I should have a good shot at winning, right?” Not surprisingly, her name was Krenov. It was Tina, Jim’s daughter, making her annual visit to check up on her dad’s legacy.
‘Which piece is yours?’ she asked me.
‘It’s the mahogany pipe cabinet with the spalted live-edge panels,’ I replied. And then I paused for a second. ‘Actually... do you want to hear a story about it?’
‘Definitely!’
So I told her how I had inherited my grandfather’s pipes years ago, and had always wanted to build a cabinet to display them. A couple of years ago, when I finally got serious about doing it, I started doing some research. One of the books I came across was James Krenov’s ‘A Cabinet-Maker’s Notebook.’
I’ve written about this book before and about the huge influence it had on my decision to come to the College of the Redwoods.
Well, in that book among the examples of JK’s work, was a pipe cabinet he had built for a client out of English brown oak.
When I eventually applied to CR, got in, and started considering what my first project would be, it just seemed right to decide to finally build the pipe cabinet, as inspired by Krenov himself.
I felt a little silly about blabbing so much of my story to a stranger, but she seemed genuinely glad to have heard the story, and I was glad I got to share.
The end.

Friday, January 24, 2014

Finishing strong and starting all over again...and again

It’s been an interesting few weeks for me around the wood shop leading up to the Christmas break and since we returned earlier this month.
In terms of my cabinet, I met my goals before the holidays: everything completed except for a few small details – mostly related to hardware and the fit of the doors, and cleaning up a few scuffs and scratches.
And a week into this semester I had those details taken care of and was able to present the final product to the class! Here it is:

After that I started thinking about my next project. We’ve been introduced to the technique of veneering, so that was an option, another cabinet was also possible, maybe on a stand, or I could build a chair. There were lots of options, and some of my classmates were racing ahead, mocking-up their ideas, choosing wood, while I was poring through books and photos, trying to get inspired.
I went through a bunch of ideas, but nothing really grabbed me until I saw two different settees – one a Shaker style with turned legs and stretchers, the other inspired by Shaker craftsmanship but more of a modern piece.
I came up with a sketch that combined elements of both into one piece, and suddenly I was inspired and ready to get to work! Here's my drawing: 
But then, as things often go, I was told that the wood I wanted to use wouldn’t work, and that the piece was probably too ambitious for me, and it would be difficult to complete it on deadline, and that I should reconsider – my instructors thought a bench would be a workable compromise.
Back to the drawing board. Literally. I sat down and started sketching – partly to clear my head, and partly to try and find some inspiration. Here are some of the random drawings I did: 

Then my instructor Laura suggested I might be interested in building something called Vidar’s Chair. The piece was designed and built by Vidar Malmsten (son of Carl Malmsten and a friend of James Krenov). He actually completed the piece in Krenov’s shop after bringing it over on the back of his bicycle. More about that later.
Laura’s reasoning was that it would allow me to still build a ‘sitting object,’ but since we have plans for the chair, and the instructors are very familiar with it, it would be more achievable than the settee. I wouldn’t have to start from scratch, coming up with drawings and a design from nothing more than a photograph, but could work from the plans and draw on other’s knowledge.
Ben, a second year student who built a pair of Vidar’s chair’s last year, was also encouraging and said the project gave him the skills he needed to build the beautiful settee he did this year.

So, I pulled the trigger and am building a pair of these chairs. One with arms, and one without. I spent the last couple of days making templates, getting familiar with the chair and building a form to bend the back stretcher. And I’m heading to Santa Rosa on Monday to buy the wood I need. Boom. This is happening. Here’s what my drawings look like… 
And here are Ben's chairs from last year. So sweet... 

Sunday, December 15, 2013

Let go, wind, and the pain (and joy) of deadlines


I heard it said last night that in woodworking, when you think you’re 90 per cent done, you have 90 per cent of the work still left to do.  That proved to be true the past couple of weeks.
Myself and other students have been putting in crazy hours to try and finish up all the details by the holidays (which started yesterday).
I knew I had a lot of work to do, so I decided my goal was to have the doors hung on my cabinet, the back panel glued in, the drawers fit and all the necessary repairs and clean up completed to the outside.
That would leave just door handles and drawer pulls, and making racks to hold the pipes, which will be on display in the cabinet. But I was okay with leaving those tasks until after the holidays. The real deadline is Feb 1, when our pieces will be on display in the mid-winter exhibition, so there will be some time to finish up in January.
Fitting a couple of drawers so they open smoothly and stop where they’re supposed to, hanging doors so they swing open evenly and close with a gentle click – these are things that sound simple. But they aren’t, of course.
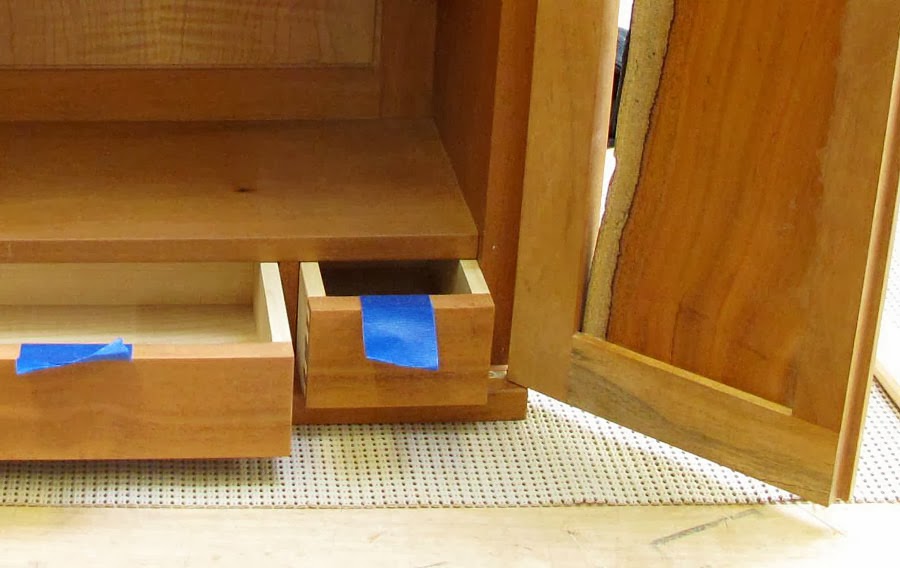
Drawers, built to be slightly larger than their pocket, needed to be planed down and formed into a subtle wedge-shape, so they come to a smooth stop just before falling out – something we call ‘let go.' That took about three solid days.
The doors, also slightly too large (they were the first part of the cabinet I made, months ago) needed to be cut down until they fit into the cabinet, then hinge mortises needed to be cut, and the hinges positioned delicately and carefully until the doors work just right.
And in that process, I discovered one of the doors had ‘wind’ -- essentially, it had twisted slightly at some point and no longer made a perfect fit with its mate. So that had to be fixed.
But finally, after working until almost midnight Friday, and scrambling Saturday morning to finish up some final details, I was able to check off the doors, drawers, back panel, and even had time to fix some dings and scratches in the finish of the cabinet.
Yes there are parts that are still incomplete, but the vast majority is done and I met my goals and can go home for the holidays at peace with my project – which for the first time, actually looks like a real thing.
It also looks beautiful – something I tend to forget in the long days and weeks and months of toiling over one piece that eventually begins to feel like a collection of mistakes and fixes. But last night, with the cabinet sitting on my bench during our woodshop Christmas party, I couldn’t help but be reminded that it is a beautiful thing, made from precious wood, that has sentimental value and will stay with me hopefully for the rest of my life.