Sunday, December 15, 2013

Let go, wind, and the pain (and joy) of deadlines


I heard it said last night that in woodworking, when you think you’re 90 per cent done, you have 90 per cent of the work still left to do.  That proved to be true the past couple of weeks.
Myself and other students have been putting in crazy hours to try and finish up all the details by the holidays (which started yesterday).
I knew I had a lot of work to do, so I decided my goal was to have the doors hung on my cabinet, the back panel glued in, the drawers fit and all the necessary repairs and clean up completed to the outside.
That would leave just door handles and drawer pulls, and making racks to hold the pipes, which will be on display in the cabinet. But I was okay with leaving those tasks until after the holidays. The real deadline is Feb 1, when our pieces will be on display in the mid-winter exhibition, so there will be some time to finish up in January.
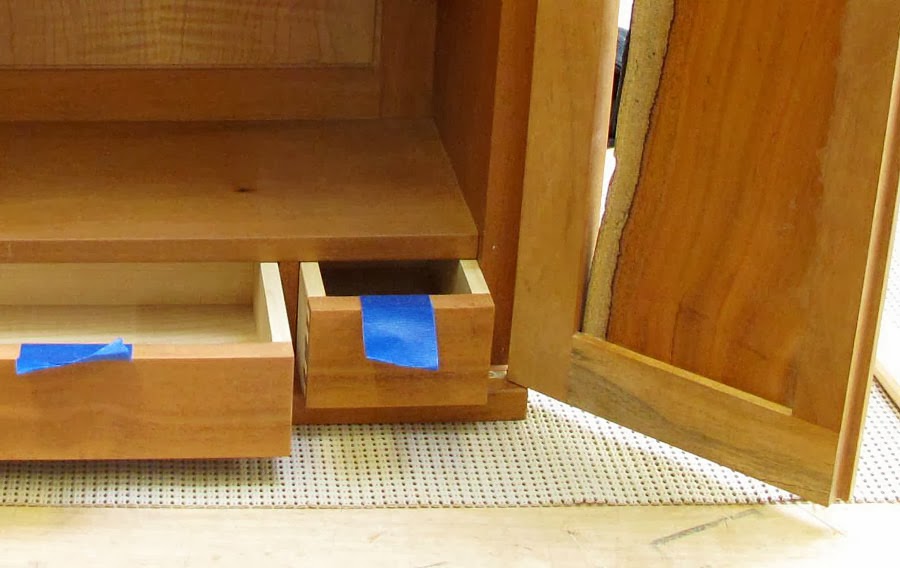
Fitting a couple of drawers so they open smoothly and stop where they’re supposed to, hanging doors so they swing open evenly and close with a gentle click – these are things that sound simple. But they aren’t, of course.
Drawers, built to be slightly larger than their pocket, needed to be planed down and formed into a subtle wedge-shape, so they come to a smooth stop just before falling out – something we call ‘let go.' That took about three solid days.
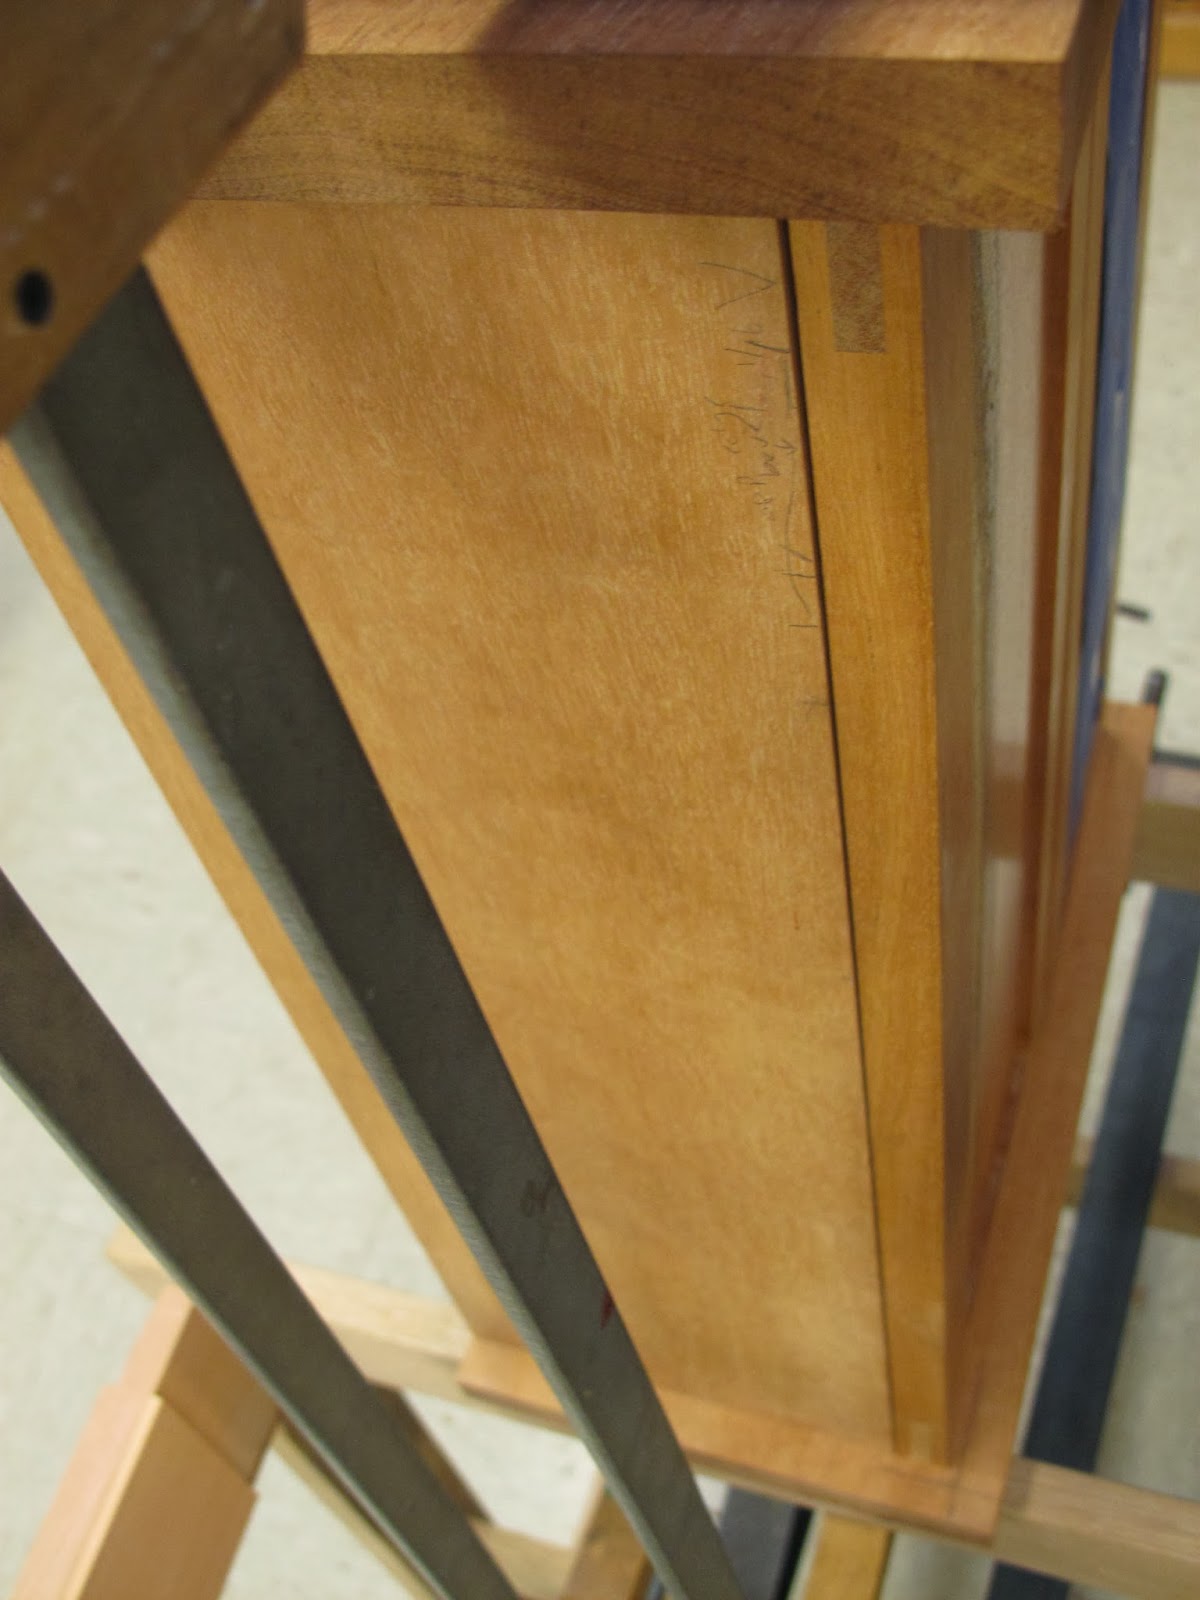
The doors, also slightly too large (they were the first part of the cabinet I made, months ago) needed to be cut down until they fit into the cabinet, then hinge mortises needed to be cut, and the hinges positioned delicately and carefully until the doors work just right.
And in that process, I discovered one of the doors had ‘wind’ -- essentially, it had twisted slightly at some point and no longer made a perfect fit with its mate. So that had to be fixed.
But finally, after working until almost midnight Friday, and scrambling Saturday morning to finish up some final details, I was able to check off the doors, drawers, back panel, and even had time to fix some dings and scratches in the finish of the cabinet.
Yes there are parts that are still incomplete, but the vast majority is done and I met my goals and can go home for the holidays at peace with my project – which for the first time, actually looks like a real thing.
It also looks beautiful – something I tend to forget in the long days and weeks and months of toiling over one piece that eventually begins to feel like a collection of mistakes and fixes. But last night, with the cabinet sitting on my bench during our woodshop Christmas party, I couldn’t help but be reminded that it is a beautiful thing, made from precious wood, that has sentimental value and will stay with me hopefully for the rest of my life.


Tuesday, November 12, 2013

What James Krenov and Farley Mowat Have in Common


Last week we were shown a slideshow encompassing most of the pieces James Krenov made while working as an instructor at our school, over a period of 20 years or so.
The cabinets ranged from his traditional display cases mounted on stands, to some more wild and experimental pieces he made later in his career. David Welter explained how they were made and some of the thinking that went into the design and construction process.
But one of the photos was different, just an image of Krenov reading to the class from a book.
Photo courtesy of JamesKrenov.com (photo credit goes to David Welter)
It was explained to us that the book was “Sun, Sand and Stars,” the memoir of Antoine de Saint-Exupery, the French pilot and author who wrote “The Little Prince.”
Each year, David said, Krenov would read a passage where Saint-Exupery describes how he and the other pilots stationed with him in North Africa would keep an eye on the lanterns in their tents for signs of an approaching sand storm.
If new species of insects began to appear around the lamps at night, they knew they were being driven by a weather system coming towards the area, and to prepare for a storm.
Krenov used the passage to illustrate how we need to be aware of our environment, our materials and tools, and to learn to really see the changes taking place around us in order to become skilled, sensitive woodworkers.
I liked the story, and as a big fan of “The Little Prince” it inspired me to find Saint-Exupery’s memoir and read more.
The story also reminded me of the words of advice given to me by Farley Mowat, a legendary Canadian writer and environmentalist famous for writing about Canada’s Arctic people.
In the early 2000s I interviewed Farley because he happened to live in the small town where I worked as a newspaper reporter, and one of his short stories had been turned into a film called “The Snow Walker.”
It’s a story about a brash young bush pilot who only cares about himself and his machine, until he crashes in the Barrenlands in the company of a young Inuit girl, and has to rely on her to survive the harsh environment.
We talked about the movie, the book, Farley’s role, and then sat down to have a whiskey and cranberry juice along with Ted, the paper’s photographer.
Farley turned the tables, and asked me what was going on in my life. I told him it just so happened that I was about to head to Morocco for a year to volunteer with a Christian organization working in the region.
Farley, in his mid-80s at the time, almost jumped out of his seat: “You need to learn the lessons of The Snow Walker! You can’t go over there thinking you can teach people and change them and make their lives better until you understand them, their environment, and live alongside them!”
It was great advice and sparked a conversation about the nature of that type of work and the importance of being tuned into the things around you, the value of paying attention, seeing and feeling and being open to learn – things I now know James Krenov also valued, though in a slightly different context.
 In the end, I guess the goal for both Mowat and Krenov was the same. By being tuned into their surroundings, by always being willing to learn new things and become a student – they believed that their work, their lives, their interactions, became better as a result.
The fact that both of them produced incredible work right up until old age (Farley is still going strong), is one more reason to be inspired by their way of looking at the world.
At the end of David’s slide show, he said “and I thought you might like to see the real thing,” and casually brought out a Krenov cabinet – the first many of us had ever seen. It’s in the photo below…

Monday, November 4, 2013

In Woodworking it all Hinges on the Little Things


It seems I’ve been spending all my time and energy dealing with little things recently -- seemingly insignificant, unimportant challenges or problems that end up taking days or even a week to solve.

I recently wrote about the troubles I had getting the ‘wind’ out of my cabinet doors and ensuring they fit snugly against the sides with no rattle or gaps.

Then I moved on to hinges, and spent another week struggling -- cutting small pieces of brass, drilling and counter-sinking, pressing steel pins into the hinge leafs and striving for a smooth swivel action on a perfect 90* axis.
Bet these hinges don't look like they took 4 days to make. Or that they're garbage, But they did, and they are.

Those hinges finally got the OK (after an embarrassing number of botched sets), and this morning I started the week with a new task – making a ‘map’ of my cabinet and the doors in order to figure out exactly where the hinges will go, to ensure the doors swing open smoothly and close tightly.

Such a simple-sounding task, yet so crucial and fraught with so many potential errors. To minimize the chance of mistakes, we create a full-scale paper plan of the cabinet, complete with swinging cardstock to represent the doors, to find out where the pivot points need to be.

Once that relationship is established, we make a spacer that ensures all four hinges are set at the same distance from the sides. And finally we mark and cut the mortises for the hinges. My classmate Henry cut 30 test mortises on scrap wood before he felt comfortable enough to cut into his cabinet – it’s that tricky.

I don’t want to lose you in the details (if I haven’t already) but the point is that these little details add up. The reason it takes hours, days, or sometimes a week to accomplish something so simple, is that it needs to be done just right or the cabinet won’t be right.

And so, if it takes a week to make four simple brass hinges (that are made properly and work the way they should), that’s ok.

I wrote that as if I believe it, but I’m not sure I do just yet.

I still have that git-er-done mentality that fools me constantly into thinking I’m a failure and woodworking isn’t for me because I’m so painfully slow, and my mistakes are so glaring (at least to me), and I can’t simply Git. ‘Er. Done as I can in other areas of my life.

But there’s a quote by Samuel Johnson on the wall at the front of our workshop that I find myself turning to more and more in those moments of self-doubt. It says: “What we hope ever to do with ease, we must first learn to do with diligence.”

I’ve been taking comfort in those words and the truth they represent. Difficult tasks eventually become easier, but only after a lot of effort, pain, and even failure.

I’ve been trying to remind myself of that when I struggle through a hard week of seemingly constant failures, what I’m actually doing is learning “to do with diligence” the things that will hopefully, possibly, some day come with ease.
Finally, hand-made hinges that will work the way they're meant to!


Friday, October 25, 2013

Stepping Back to Move Forward

I woke up at 4 am this morning out of a deep sleep, wide awake with an idea about how I could solve the latest problem with the cabinet I’m building.
The waking-up thing has happened a few times this week, but usually it’s been accompanied by an anxious ‘what am I going to do’ kind of feeling – and without the answers.
The week has been stressful, as I’ve spent almost all of it trying to chase out a gap where the doors will meet the cabinet sides. It feels silly to write and it probably feels that way to read as well. It was just a small gap – in a place that will have a gap anyway when the doors and hinges are actually installed.
But I want everything to be as close to perfect as possible in this piece, and a weird mystery gap just isn’t acceptable.
Photo shows the gap between the door and the cabinet side.
In a perfect world, the sides of the cabinet would be flat and square, and the doors would be flat and square, and everything would come together tight and gap-free. But that wasn’t happening for me.
I spent four straight days scraping a little here, sanding a little there, planning over here, and by the end of day Thursday the thing looked worse than it did on Monday morning. I was trying to sculpt two imperfect pieces of wood together and it just wasn’t working.
My epiphany at 4 am was this: Take a step back. Flatten the doors and the cabinet sides, essentially taking them back to where the started, and see what happens.
Funnily enough, my bench mate Jim had the same idea this morning, and so did Laura, my instructor.
So I did it. Four days of work down the drain, but when I reset all those edges, and made one additional adjustment, they came together as tight and perfect as I could have hoped.
No more gap!

And I was happy, and could go to Elephants (Friday night beers around the woodshop bonfire) with a clear conscience and an accomplishment to actually celebrate.
It’s strange, this type of work. Small, seemingly insignificant challenges can occupy days of work and can cause all kinds of stress. But when you get there, when you finally figure it out and are able to move on, it’s incredibly rewarding – and you learn so much in the process.
I may have only got one thing done this week, but I know I learned lessons that will stay with me for years to come. And I’m one step closer to a finished cabinet.


Thursday, October 10, 2013

How a Bad Day Resulted in Prettier and Better Cabinet Doors

Last Saturday was a bad day.
I had spent a few days working on the panels for the two doors that would enclose the front of the cabinet I'm building, and would therefore be the centrepiece of the whole project. The doors would be built first, then the rest of the cabinet built around them, so they had to be just right.
I had chosen to use mahogany that was spalted – a type of fungal disease that attacks trees, but often leaves them with beautiful and unusual patterns and colours.
But the problem was that part of the spalted edge, which would comprise part of a ‘live-edge’ component of my cabinet doors, was also slightly worm-eaten and a little rotten.
I had thought I could work with it and live with the worm holes, and that the uniqueness of it would make up for any structural issues in the wood.
But then on Friday, as I was cutting a profile into the edge of the panels, the corner of one ripped off, its lack of structural integrity causing weakness in the wood.
Here are the original panels, with one broken corner visible in the top left.

I was able to re-attach the broken corner and salvage the piece, and was pretty happy with the repair job -- the fixed fracture was almost invisible.
Then on Saturday, as I was shellacking my panels, the second piece slipped out of my hands and landed on the floor, the weak corner exploding into a million pieces.
Bad way to end the week.
I went home, tried to forget about the disaster, and enjoyed Sunday away from the workshop, though in the back of my mind the wheels were turning as to how I could resolve the conundrum.
By Monday I had made up my mind. I bought a new piece of mahogany first thing in the morning -- a different board but cut from the same section of the same tree – and began making new panels.
But this time I avoided the rotten section and was able to cut strong, solid panels that were easily as pretty as the original set, but had no worm holes, rot, or strength issues.
And because I had just gone through the process of making the original panels, I was able to do it quickly and without stress.
By the end of the day I had beautiful new panels that were cut to size, sanded, shaped and ready for shellac.
Here are the new panels after treatments of shellac and wax, ready to become doors.

The experience reminded me that sometimes a mistake, or an apparent unexpected setback in a woodworking project, can force the maker to take a step back, reconsider his plans, and sometimes come up with a much better approach.

That’s what happened this time, and I’m pretty happy about how it all turned out.
Here are the panels glued-up in the frames. Their positions will be reversed on the actual cabinet, with the live edges on the outside edge of each door.

Wednesday, October 2, 2013

Inspiration Comes Full Circle and How Furniture Can Capture the Heart


James Krenov used to say that when someone falls in love with a piece of furniture, they’ll do anything to own it -- re-mortgage their house, sell their first-born – whatever it takes. They have to have it.
I guess that’s what a fine woodworker has to depend on if they’re going to survive. When a piece takes weeks, even months to complete, it needs to sell for a decent price if the craftsman who made it is going to be able to survive.
As it turns out, it’s not only ‘customers’ who can come under the spell of a piece of furniture.
Recently, one of our instructors at the College of the Redwoods, David, shared with us a mock-up for a chair he is building.
David said he hasn’t built much in recent years, and his creative bent has been fulfilled by helping us students get started on our own projects and careers. And he helps us immensely every day, from showing us how certain tools work, to parting with precious pieces of lumber he has collected over the years, to simply looking at a problem and saying “here, try this.”
But before he got into showing us his chair mock-up, David told us about one of the exceptional alumni at the school, Sarah Marriage (mentioned in an earlier post here), and showed us photos of some of her projects. She made some truly inspiring, beautiful pieces.
After going through the slides, David showed us a writing desk Sarah had built, and said he had fallen in love with it as she designed and built it in the shop at our school.
“So, I decided to save her the trouble of shipping it off to a gallery, and bought it from her myself,” he told us.
What a compliment. Anyhow, the writing desk has sat in his home for several years, but without a chair. Recently he was stirred, came up with a design, and began putting the model together.
David was inspired by the work of a student, and I, and others, were inspired by the realization that even someone who has seen literally thousands of pieces of beautiful furniture come through the school, could still be captivated by the simple lines contained in a writing desk conceived and built by a student.
Amazing.

Wednesday, September 25, 2013

Krenov on making furniture for 'Those People'


Just wanted to share something I read recently by James Krenov, about what he calls ‘Those People’ and the notion that fine woodworkers often struggle with making furniture for the very rich – because they are among the few who can afford it – and how that isn’t always a pleasant circumstance.
Here are his thoughts on that:
“Traveling reminds me again that there is little or no connection between wealth and that thing called good taste. Nor does money make someone a better person, or a worse person either. What it probably amounts to, for some of us at least, is that we are doing honest work, out best, with feeling in it, and we hope to meet people who will appreciate and want it. Some poor people with whom we get along very well will understand and say that they are sorry, but….
“Another person, of modest means perhaps, might ask to pay a bit at a time, and something tells us to trust him or her. Wealthy people come and ask the wrong questions and we feel so uneasy that some of us just do not care to let them have the piece, But there are also some with money and taste and a simple warmth that gets through our ‘those people” filter: we enjoy telling them about our work, they listen – there is contact, a kind of understanding.
“Nothing else matters, really. It is all about people…the only qualification being that they are the kind of people who do not make us unhappy at our work or about our work – this is vital.” – James krenov (The Impractical Cabinetmaker)
I just liked those words and the sentiment behind them. Hope you do too.

Tuesday, September 24, 2013

How To Turn a Sow's Ear Into a Silk Purse

My 'sow's ear,' right, and the frame and panel clamped together for glue-up, to the left.
There’s an old saying that goes like this: ‘You can’t turn a sow’s ear into a silk purse.’
I always liked the expression because it’s so visual, you can’t help but picture the process of trying to do just that, and the grotesque, inevitable end result.
Our last assignment before moving on to our first major project was called the ‘Sow’s Ear’ exercise.
We were given a big chunk of poplar – an inexpensive, generally unattractive wood most people consider to be ‘paint grade,’ and given a list of smaller boards to mill out of the thick, heavy plank.
Then, we surfaced the wood, made our final cuts, and prepared to join the pieces into a cabinet, starting with the frame – essentially two sides and a top and bottom, joined together with dowels.
Once that was done, we constructed a frame-and-panel for the back of the cabinet, and decided on design elements such as shelves and doors. Some students even decided to make drawers.
Essentially, the assignment was meant to pull together a bunch of the skills we had learned, teach us some vital new ones, and give us the experience of building a complete piece from start to finish, before moving on to the real thing.
It was a lot of fun, but also stressful. We’re lucky enough to be enrolled at one of the more esteemed and well-known woodworking schools in the U.S., and the pedigree here is high. A lot of incredible woodworkers have come through here and made names and successful careers for themselves. Most of us want to do that too.
As a result, there’s a general desire among people here to do everything well. Which is where the name of the exercise comes from. Even though this is essentially just practice, many of us stressed over our little cabinets, lost sleep, spent days struggling with certain details. All in an effort to turn a sow’s ear into a silk purse – something we all know is impossible.
But anyway, in the end, though it’s made with cheap, unattractive wood, there’s something about this little creation that makes me happy, looking at it sitting beside my workbench.
Maybe it’s because it represents another step in this journey of becoming a woodworker, and the process of accepting that the struggle towards perfection is sometimes enough.
The final product!

Tuesday, September 17, 2013

Coopering -- Or how flat surfaces become round

I continue to be amazed by what can be done with wood when the proper tools and techniques are used. The latest thing to blow my mind is coopering.
The word comes from the name for barrel-makers because it incorporates some of their techniques for creating curves with wood.
It’s really simple. You figure out the curve you want and sketch it on a piece of paper. Then you take a flat board and mark it out in sections to be cut lengthwise, typically with smaller pieces (they’re called ‘staves’) near the outside, and wider ones in the middle.
Then you cut the staves out of the board, rearrange the pieces along the curve you want. Then you cut the edges of each board on an angle to create the curve, and rejoin them together with glue.
Benchmate Jim glues up his coopered door. The process takes time as only two or three staves can be clamped and glued at a time. The mating edge of each individual piece has been cut on an angle, or bevel, to make the curve.
And boom, you have the rough beginnings of a curve.
Of course at this stage the board is still faceted with the flat surfaces from each of the individual staves, and needs to be planed down with a round-bottom plane on the inside, a smoothing plane on the outside, then scraped and sanded until a perfectly smooth curve is achieved.
Using my round-bottom or coopering plane to turn the flats into curves.

But when it’s complete, it’s a beautiful thing. And when it’s done properly, the boards repositioned so the grain matches up, it almost looks as though it grew that way or was carved out of a solid piece. Amazing!
The finished board, ready to be hung as a door on a small cabinet!


Monday, September 16, 2013

Dovetail joints and other things that come together and become strong


In the old days, cabinetry was actually called ‘joinery,’ because at it’s heart, that’s what it is – putting pieces of wood together in as permanent a way as possible.
And so we have been learning the fundamentals of that process, beginning with mortise and tenons (through-mortise, haunch-mortise and stop-mortise) – a basic, fundamental joint that looks like this:

A day after that, we had our first lesson on dovetails. And many of us, including myself, slept restlessly the night before. It’s intimidating. Dovetails are simple, yet complicated, fragile, yet incredibly strong when mated, and though many amateur woodworkers claim to be able to make them, few have mastered the skill.
Of course, our instructor Jim Budlong made it look easy, marking out, sawing, then chiseling a set of near perfect dovetails in front of the entire class, in about 20 minutes.
Instructor Jim Budlong demonstrates proper dovetail-technique. True story: He once tried to mess up his dovetails in order to show the class how to fix them -- but accidentally made perfect ones. Amazing.
It took the rest of us, and myself, much longer to get anywhere near acceptable, let alone perfect.
A dovetail joint is considered a ‘mechanical joint.’ It’s called that because two pieces of wood are held together not simply by glue or dowels, but by a series of pins and tails that lock together in such a way that the pressure exerted on them, say in a dresser drawer, actually serves to make the joint tighter over the years, not looser.
But because of that, they are difficult to make, with complicated angles and often dozens of surfaces required to meet perfectly in order for the join to look good.
There’s a reason perfect dovetails are seen as a mark of true craftsmanship, even though they are usually hidden away in the back of a drawer in a cabinet or dresser. When done well, they are sophisticated, beautiful, and add strength and durability to a piece of furniture for decades, even centuries to come.
Done poorly, they can cause fractures or cracks as the two pieces of ill-fitting wood are forced together. If the dovetails themselves are too small, too thin, their strength gives way to fragility. If the dovetails are too large, too evenly spaced, or poorly laid-out, they become clunky and awkward to the eye regardless of how perfectly they were cut.
In the examples we were shown from past years’ students, there is one that was particularly disheartening. A set of dovetails, perfectly cut, fitting together like a glove, were labelled by some heartless instructor as being “too perfect, looks machined.” Unbelievable!
A dovetail, at its best, is not cut on a router jig or by a giant machine in a factory somewhere. Rather, it’s the work of a careful craftsman who cares about little details, such as the size of the pins and the fact the pins on the outside of the joint should be closer together than those on the inside, because there is greater stress.
A craftsman knows these things and takes them into account, and the final product reveals that. A drawer cut by a machine simply doesn’t have the same effect. Or at least that’s what we’re being taught, brainwashed really, as our instructor joked recently.
I’ll take it. The challenge is fun, despite the frustration, and getting it right in the end is so worth the effort.
And the hope is that all these various components of our woodworking education, from sharpening to tool-making, planing and joinery, will all add up and eventually come together, like the two sides of a dovetail joint, and create a firm, long-lasting bond that will only get stronger in the years to come.
Some of my many dovetail attempts!


Friday, September 13, 2013

Measure Twice, Cut Twice


So there's an expression used in general construction or woodworking: Measure twice, cut once.
It basically means, be extra careful before you cut, so you get it right the first time.

Today I invented a new version of that time-tested cliche: Measure twice, cut twice. Basically, it means measure twice, but leave enough of a margin for error, so that if you have to cut twice, you're able to do so.

Luckily, I was able to. We spent the last couple of days making round-bottom coopering planes. These are more complicated than the planes we've previously made, and are used to make curved doors, which are pretty much the coolest thing ever.

Once mine was cut, laid out, glued up and ready to go, I sketched out a shape that a liked and headed into the machine shop to cut it out. I even showed it to my benchmate Jim and a friend Max, and they both liked it.

I cut it out on the band saw and walked back to my bench feeling pretty awesome about it, when I suddenly realized it was backwards. I had completely reversed it, and the plane's shape suddenly made no sense at all.

I quickly put it under my bench and sat down, feeling miserable. Jim took one look at me and said 'where's your plane??' thinking I had thrown it in the trash.

I pulled it out and showed it to him, and he studied it for a minute before breaking out laughing. He's normally a pretty polite guy, but couldn't control it. I don't blame him, I busted out too, and pretty soon a group had gathered around, all laughing at my mistake.

Then Laura, our instructor and the director of the program, came over asking to see me 'Canadian pull plane,' had a good laugh and quickly showed me how I could fix it.

In the end, all was well because I had enough material to change the shape and reverse the direction -- essentially, to fix my mistake. The lesson: Measure twice, cut twice.

Or better yet, learn from my mistake and get it right the first time.

Thursday, September 12, 2013

The Impossibility of The Perfect Board

One of the most difficult exercises we worked on in the first few weeks of our time here was called The Perfect Board.
And it’s really just as it sounds. The project begins with a small maple board, roughly cut to about 12 by 10 inches.
Our challenge was to rip it down the centre on the bandsaw, then join it back together along the ripped edges, using our new planes to smooth and flatten those edges until they mated perfectly – the joint nearly invisible to the eye.
Once that was complete and the board had been glued back together, we moved on to planing the two sides -- using our new smoothing planes to remove any ripples, high and low spots, and machine marks -- until those two surfaces were flat, free of ridges, and gleamed and shimmered the way only a perfectly tuned plane can make them.
Once that was finished, and believe me, these were all hours-long steps, the board’s edges must be flattened, made to be 90 degrees and perfectly parallel to their opposing edges.
I spent four days wrestling with this project. It was painful, frustrating, exasperating, and often seemed to be a hopeless and useless task.
I knew it wasn’t, though. In my heart, I knew I was learning valuable lessons about how to use my planes, how to adjust and tune them, how to take an imperfect surface and make it into something beautiful.
ButI won’t say ‘perfect,’ because although that’s the name of this exercise, it’s really not accurate.
There’s no such thing as a truly ‘perfect’ board. Our tools may not be precise enough to measure or identify the imperfections, but they are there. Wood, a living thing which still absorbs and emits moisture long after it goes from being a tree to a plank of wood, continuously moves, change and shifts.
That flattened surface, so wonderful one day, such a badge of accomplishment and skill, may be cupped or crowned the next as a result of nothing more than a slight change in humidity.
And that’s the real lesson we were being taught – that perfect isn’t necessarily something to be achieved in woodworking, but rather the goal is to get as close to it, in as beautiful, practical and as useful a way as possible.
Sarah Marriage, a student who finished her time at the school last year, put it this way in her own blog about the exercise:
“What I liked about the idea of the perfect board exercise is that there is no pretense of possibility. There is no romantic notion of some sort of actual attainment of perfection, just the romance of accepting the impossibility.”
At the College of the Redwoods we are taught to strive for perfection, and a craftsman always should if he or she values their work and seeks to do it well. But true perfection may lie not in the accomplishing of that goal, but in the striving towards it.
After all it’s in the striving that the skills are learned, the battles are fought, challenges overcome, and where the piece is refined and developed and pushed towards that standard.
And in the end it’s the complete piece, with all those millions of large, small and microscopic imperfections, that adds up to something that as a whole, could be called beautiful, and even perhaps, perfect.


Monday, September 9, 2013

Elephants for everyone!

Every Friday we do something at College of the Redwoods called 'Elephants.' It's a simple event -- at 5:30, once the shop has been cleaned up, everyone gathers at the firepit and barbecue area beside the school, and we consume beverages and eat food and celebrate the accomplishments of the week (or try to forget the failures.)

Current students, former students, staff, local woodworkers, friends of the school -- pretty much everyone and anyone is invited and usually they all show up.

It's a great tradition that has been going on for years, and allegedly derives its name from the beer made by Carlsberg, a Swedish company, that was once much more common and easy to obtain around these parts. James Krenov, the legendary cabinetmaker who founded our school, studied cabinetry in Sweden, so the legend kind of makes sense.

Elephant beer is a lot harder to find these days in Northern California, where so many micro-breweries are doing such good work, but nonetheless the tradition and name continue.

Last Friday, while we were enjoying Elephants the event, and also coincidentally Elephants the  beer, since a student's father dropped off an entire case he specially ordered as a generous gift, something awesome happened.

A former student arrived at the gathering carrying a giant white cooler full of beer, which he ceremoniously set down on the picnic table.

He then climbed on a bench, got everyone's attention, and said "I just got a sweet woodworking job, and it's all thanks to College of the Redwoods. So everything in that white cooler is up for grabs!"

Even though most of us had never met this man, he wanted to celebrate with us and share his good fortune with those who are studying at his alma mater, and who are also hoping to follow in his footsteps and one day obtain a 'sweet job' in the field.

It made me proud to be part of a woodworking program that has such a community of support built up around it. And also, we got free beer, which is always great.


Sunday, September 8, 2013

Perfect 'Enough'?

"Sometimes almost perfect is perfect enough."

That's a quote from Friday morning, when one of the second-year students, Josh, was presenting a beautiful bench he designed and built as a quick project to start off the year. I say quick, but he still put about 50 hours of hard work into the piece, which was a commission for a friend.

Josh was describing the concept, the clients' desires for the piece, and the setting where it would live -- in a busy part of a family home with young children.

He also talked about the challenges he faced with the project, and some of the mistakes he made and  a couple of aspects of the finished product where he felt he could have perhaps done better.

That's when Laura Mays, one of our instructors and the director of the program, spoke up and said Josh was being a bit hard on himself. She suggested the piece was perhaps not perfect, but was easily perfect enough for its purpose.

Woodworkers, especially those that come out of this program, can become a bit OCD about their work, with the tendency to sometimes toil endlessly in pursuit of a level of perfection that isn't always necessary, financially viable, or even possible.

Part of the purpose of this whole becoming-a-woodworker thing, Laura seemed to be saying, is learning to recognize when it's time to simply stand back, be satisfied, and say 'ship it!' before moving on to the next project.

More on the whole idea of 'perfection' in woodworking coming soon in a future post...
Josh presenting his bench in the shop at College of the Redwoods.

Wednesday, August 28, 2013

Some pictures from the workshop...

I just wanted to post a few pictures taken over the last couple of weeks at the workshop to give an idea of what life is like there every day. As you can see, it's pretty awesome...

Second-year student Josh is deep in thought as he contemplates his wall cabinet mock-up. The dude has skills.
While waiting for a glue-up to set on the mortise (right), I made a plane iron hammer out of some scrap maple and a piece of brass.
Classmate Jess shows off her 'perfect board.' What a champ!
Evidence that my homemade hand planes are working well.
I named this one 'Janet.' No idea why.
Second-year student Tobyn, looking badass in his shop apron, contemplates the comfort factor of the chair he has mocked-up before beginning work on the real thing.

Tuesday, August 27, 2013

Lessons in Plane-Making


Once our tools were sharp, and the process of sharpening was ingrained in our heads, we began the process of making our own planes – and we spent most of a week doing it, building a smoothing and jointer plane. One is designed to prepare final surfaces for the eye, the other to flatten edges of boards for joining, or jointing.
There are rules in plane-making but there is also a freedom.
 The rules revolve around the specific angle for the throat and ramp, the amount of space between the blade and the mouth, the spindle and the blade assemble, and the flatness of that sole, etc.
But beyond that there’s a freedom. The planes could take any shape that suited the maker.
Some people sketched out the shape, then cut them on the band saw, using it as a carving machine to leave big, rough cuts and stylistic jagged edges on the final product.
Others went into great detail in their designs, with fancy curves, handles and etchings.
And others followed the Krenovian approach, with all the artistry contained in the relationships between the different components -- the body of the plane little more than a block of wood with slightly rounded edges and a rough symmetry.
All were beautiful and useful in their own way, and each reflected the owner’s personality in some measure.
Our instructor Greg told us about a plane Krenov himself made, one of many, but which performed well for years and became a favourite.
“He just got it right on that one – I don’t even think Krenov himself could really tell you why,” said Greg.
There was just something about it, he said. The angles, the geometry, the relationships between the various parts. It worked, as Krenov would say, like a fine instrument.
Mine, just a few days old now, have already become an extension of myself. The way they fit in my hand, the finicky way the blades need to be tapped, backed out, tapped again, tried and tried until the perfect shaving is produced, the way they seem to jump to the work when tuned just so.
But more importantly, it’s the effect they have on a board that is so incredible. A piece of wood, surfaced in a planer or jointer in the machine shop and appearing perfectly fine to the eye, comes alive when the hand planer is used.
Something happens. The board begins to glow, the facets reflecting the light and revealing a warmth that was always there beneath the surface but that a machine simple didn’t have the ability to unveil.
It’s a beautiful thing and a blessing to hold the tools in my hands and know that these things, built to do work, are successful at that objective. I want to be that way too.

The Fine Art of Sharpening


One of the first things we learned at College of the Redwoods was how to sharpen tools, as well as the why and the when.
There’s a very specific process that begins with flattening the back of a chisel or plane blade. And by flattening, I mean just that. Taking a piece of flat iron, factory cut, and scraping it across three or more stones of varying coarseness for literally hours on end to remove any bumps or hollows.
Even the tiniest discrepancy in that surface will affect the performance of the blade. In a plane blade, it will cause it to sit unevenly against the chip breaker, meaning the blade will be at an angle where it protrudes from the sole of the plane, and it will always be a challenge to make that blade cut the way it was intended to – smoothly, evenly, taking tiny, gossamer-thin shavings from the surface of a board and leaving behind a glimmering, glowing surface.
With a chisel, the effect will be similar. The back of the chisel is the reference surface for every cut it makes. If that reference surface is crowned, cupped, or otherwise uneven, it will be that much harder to get a sharp, clean cut, such as when chopping dovetails or cleaning out a mortise.
Those hours and hours of work, hunched over a bench, scraping a blade against a wet stone, eventually, somehow result in a surface that is smooth, flat, and shines or reflects like a mirror. It’s a beautiful thing.
But it’s also just the start. Next, the blade must actually be sharpened – another lengthy process that takes time and energy and a lot of care and attention to get right.
But when it’s all done properly, the process results in a kind of alchemy – a piece of steel becoming so much more – a tool that can help an artist or craftsman create beautiful, lasting, meaningful things.

Thursday, August 22, 2013

At home in the Redwoods...

About two years ago I came across the name James Krenov in Fine Woodworking Magazine. It was a quotation from one of his books, describing his desire to create things that mattered, things of quality and value that could be passed down to future generations, and about the remnant of people that appreciate those sort of creations.

The words resonated with me and I ordered the book, titled "A Cabinet Maker's Notebook," in which Krenov describes his philosophy of woodworking -- an approach that has landed his simple, understated, but brilliant works in museums and art galleries around the world.

The words in that book must have done something to my soul. Because now, two years later, here I am, in Fort Bragg, California, enrolled in the fine woodworking and cabinetry program at the College of the Redwoods -- a program started by James Krenov himself, and since his passing, taught by instructors who studied under him.

This sleepy little coastal town, four hours north of San Francisco, surrounded by redwood forests, national parks, and occupied by loggers, fishermen, surfers and woodworkers, will be my home for the next year as I study the craft and try to emulate some of the values he espoused.

In this blog I'll describe the adventures, lessons, joys and frustrations along the journey. Can't wait to see where this goes!

Here's the quotation from Krenov that started it all:

"Fine things in wood are important, not only aesthetically, as oddities or rarities, but because we are becoming aware of the fact that much of our life is spent buying and discarding, and buying again, things that are not good. Some of us long to have at least something, somewhere, which will give us harmony and a sense of durability – I won’t say permanence, but durability – things that, through the years, become more and more beautiful, things we can leave to our children."