Friday, October 25, 2013

Stepping Back to Move Forward

I woke up at 4 am this morning out of a deep sleep, wide awake with an idea about how I could solve the latest problem with the cabinet I’m building.
The waking-up thing has happened a few times this week, but usually it’s been accompanied by an anxious ‘what am I going to do’ kind of feeling – and without the answers.
The week has been stressful, as I’ve spent almost all of it trying to chase out a gap where the doors will meet the cabinet sides. It feels silly to write and it probably feels that way to read as well. It was just a small gap – in a place that will have a gap anyway when the doors and hinges are actually installed.
But I want everything to be as close to perfect as possible in this piece, and a weird mystery gap just isn’t acceptable.
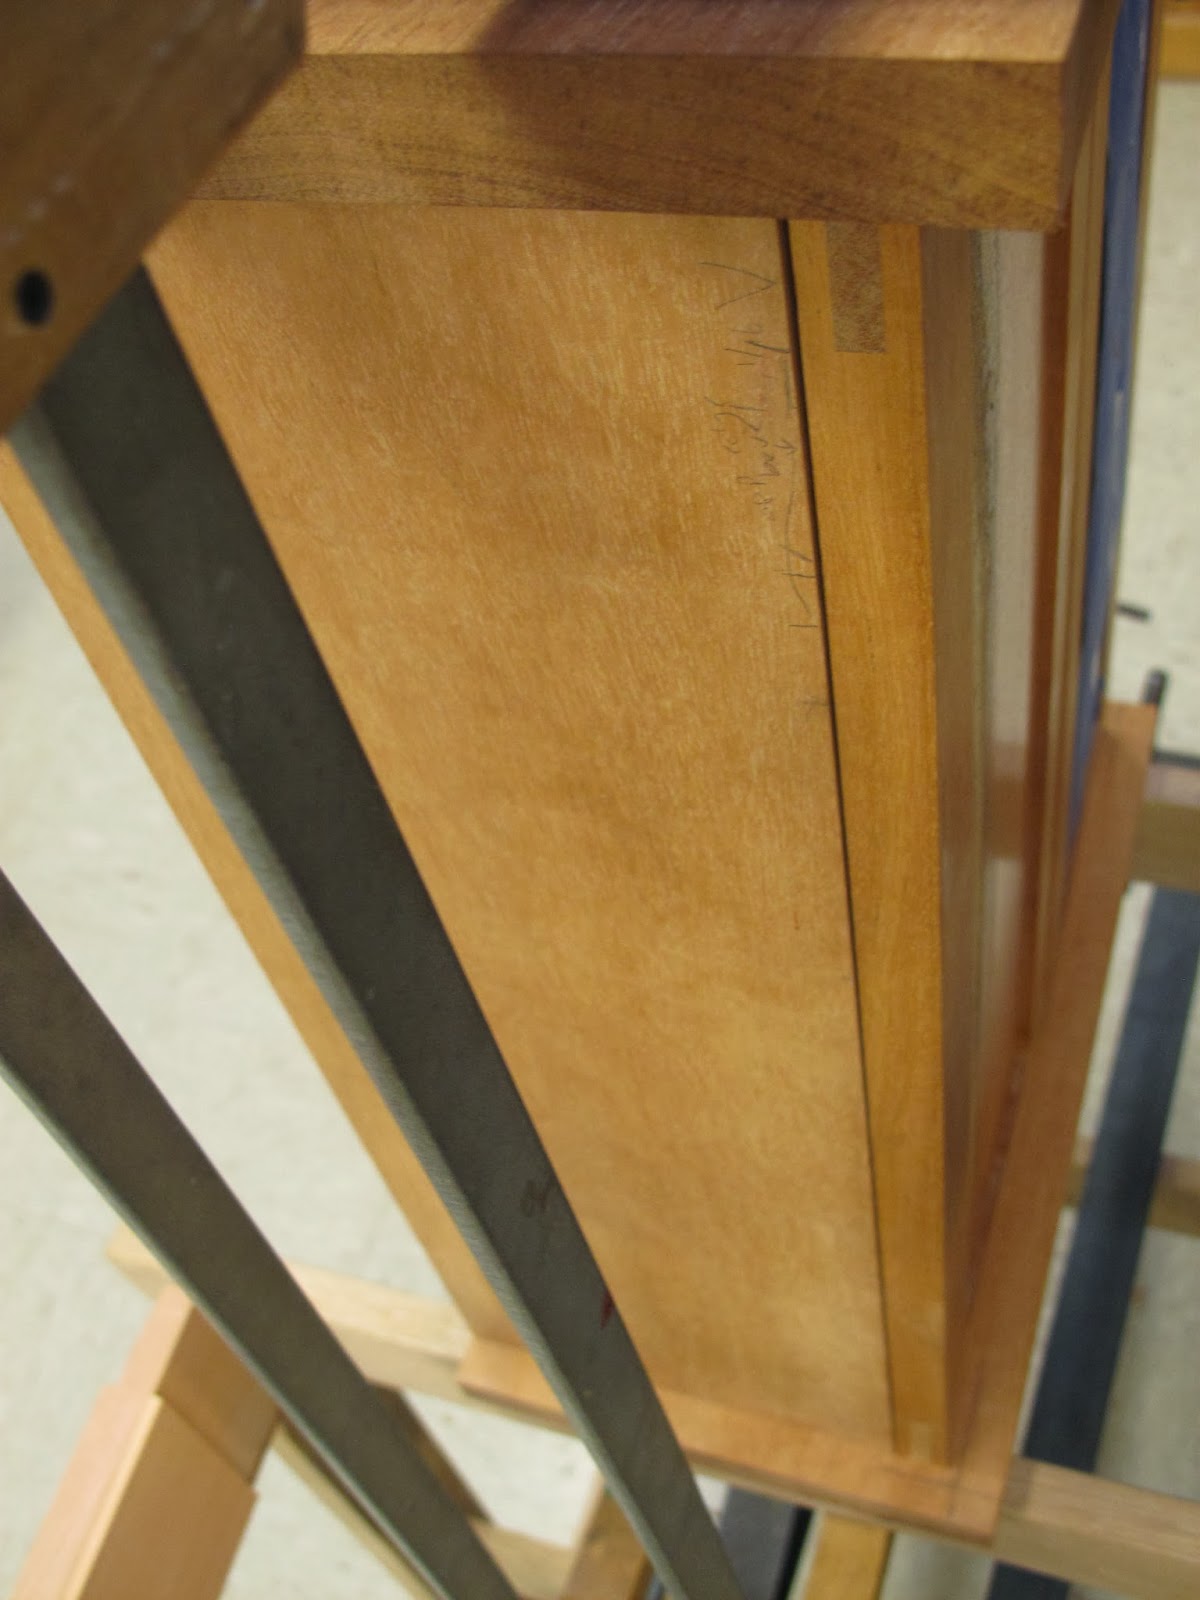
Photo shows the gap between the door and the cabinet side.
In a perfect world, the sides of the cabinet would be flat and square, and the doors would be flat and square, and everything would come together tight and gap-free. But that wasn’t happening for me.
I spent four straight days scraping a little here, sanding a little there, planning over here, and by the end of day Thursday the thing looked worse than it did on Monday morning. I was trying to sculpt two imperfect pieces of wood together and it just wasn’t working.
My epiphany at 4 am was this: Take a step back. Flatten the doors and the cabinet sides, essentially taking them back to where the started, and see what happens.
Funnily enough, my bench mate Jim had the same idea this morning, and so did Laura, my instructor.
So I did it. Four days of work down the drain, but when I reset all those edges, and made one additional adjustment, they came together as tight and perfect as I could have hoped.
No more gap!

And I was happy, and could go to Elephants (Friday night beers around the woodshop bonfire) with a clear conscience and an accomplishment to actually celebrate.
It’s strange, this type of work. Small, seemingly insignificant challenges can occupy days of work and can cause all kinds of stress. But when you get there, when you finally figure it out and are able to move on, it’s incredibly rewarding – and you learn so much in the process.
I may have only got one thing done this week, but I know I learned lessons that will stay with me for years to come. And I’m one step closer to a finished cabinet.


Thursday, October 10, 2013

How a Bad Day Resulted in Prettier and Better Cabinet Doors

Last Saturday was a bad day.
I had spent a few days working on the panels for the two doors that would enclose the front of the cabinet I'm building, and would therefore be the centrepiece of the whole project. The doors would be built first, then the rest of the cabinet built around them, so they had to be just right.
I had chosen to use mahogany that was spalted – a type of fungal disease that attacks trees, but often leaves them with beautiful and unusual patterns and colours.
But the problem was that part of the spalted edge, which would comprise part of a ‘live-edge’ component of my cabinet doors, was also slightly worm-eaten and a little rotten.
I had thought I could work with it and live with the worm holes, and that the uniqueness of it would make up for any structural issues in the wood.
But then on Friday, as I was cutting a profile into the edge of the panels, the corner of one ripped off, its lack of structural integrity causing weakness in the wood.
Here are the original panels, with one broken corner visible in the top left.

I was able to re-attach the broken corner and salvage the piece, and was pretty happy with the repair job -- the fixed fracture was almost invisible.
Then on Saturday, as I was shellacking my panels, the second piece slipped out of my hands and landed on the floor, the weak corner exploding into a million pieces.
Bad way to end the week.
I went home, tried to forget about the disaster, and enjoyed Sunday away from the workshop, though in the back of my mind the wheels were turning as to how I could resolve the conundrum.
By Monday I had made up my mind. I bought a new piece of mahogany first thing in the morning -- a different board but cut from the same section of the same tree – and began making new panels.
But this time I avoided the rotten section and was able to cut strong, solid panels that were easily as pretty as the original set, but had no worm holes, rot, or strength issues.
And because I had just gone through the process of making the original panels, I was able to do it quickly and without stress.
By the end of the day I had beautiful new panels that were cut to size, sanded, shaped and ready for shellac.
Here are the new panels after treatments of shellac and wax, ready to become doors.

The experience reminded me that sometimes a mistake, or an apparent unexpected setback in a woodworking project, can force the maker to take a step back, reconsider his plans, and sometimes come up with a much better approach.

That’s what happened this time, and I’m pretty happy about how it all turned out.
Here are the panels glued-up in the frames. Their positions will be reversed on the actual cabinet, with the live edges on the outside edge of each door.

Wednesday, October 2, 2013

Inspiration Comes Full Circle and How Furniture Can Capture the Heart


James Krenov used to say that when someone falls in love with a piece of furniture, they’ll do anything to own it -- re-mortgage their house, sell their first-born – whatever it takes. They have to have it.
I guess that’s what a fine woodworker has to depend on if they’re going to survive. When a piece takes weeks, even months to complete, it needs to sell for a decent price if the craftsman who made it is going to be able to survive.
As it turns out, it’s not only ‘customers’ who can come under the spell of a piece of furniture.
Recently, one of our instructors at the College of the Redwoods, David, shared with us a mock-up for a chair he is building.
David said he hasn’t built much in recent years, and his creative bent has been fulfilled by helping us students get started on our own projects and careers. And he helps us immensely every day, from showing us how certain tools work, to parting with precious pieces of lumber he has collected over the years, to simply looking at a problem and saying “here, try this.”
But before he got into showing us his chair mock-up, David told us about one of the exceptional alumni at the school, Sarah Marriage (mentioned in an earlier post here), and showed us photos of some of her projects. She made some truly inspiring, beautiful pieces.
After going through the slides, David showed us a writing desk Sarah had built, and said he had fallen in love with it as she designed and built it in the shop at our school.
“So, I decided to save her the trouble of shipping it off to a gallery, and bought it from her myself,” he told us.
What a compliment. Anyhow, the writing desk has sat in his home for several years, but without a chair. Recently he was stirred, came up with a design, and began putting the model together.
David was inspired by the work of a student, and I, and others, were inspired by the realization that even someone who has seen literally thousands of pieces of beautiful furniture come through the school, could still be captivated by the simple lines contained in a writing desk conceived and built by a student.
Amazing.

Wednesday, September 25, 2013

Krenov on making furniture for 'Those People'


Just wanted to share something I read recently by James Krenov, about what he calls ‘Those People’ and the notion that fine woodworkers often struggle with making furniture for the very rich – because they are among the few who can afford it – and how that isn’t always a pleasant circumstance.
Here are his thoughts on that:
“Traveling reminds me again that there is little or no connection between wealth and that thing called good taste. Nor does money make someone a better person, or a worse person either. What it probably amounts to, for some of us at least, is that we are doing honest work, out best, with feeling in it, and we hope to meet people who will appreciate and want it. Some poor people with whom we get along very well will understand and say that they are sorry, but….
“Another person, of modest means perhaps, might ask to pay a bit at a time, and something tells us to trust him or her. Wealthy people come and ask the wrong questions and we feel so uneasy that some of us just do not care to let them have the piece, But there are also some with money and taste and a simple warmth that gets through our ‘those people” filter: we enjoy telling them about our work, they listen – there is contact, a kind of understanding.
“Nothing else matters, really. It is all about people…the only qualification being that they are the kind of people who do not make us unhappy at our work or about our work – this is vital.” – James krenov (The Impractical Cabinetmaker)
I just liked those words and the sentiment behind them. Hope you do too.

Tuesday, September 24, 2013

How To Turn a Sow's Ear Into a Silk Purse

My 'sow's ear,' right, and the frame and panel clamped together for glue-up, to the left.
There’s an old saying that goes like this: ‘You can’t turn a sow’s ear into a silk purse.’
I always liked the expression because it’s so visual, you can’t help but picture the process of trying to do just that, and the grotesque, inevitable end result.
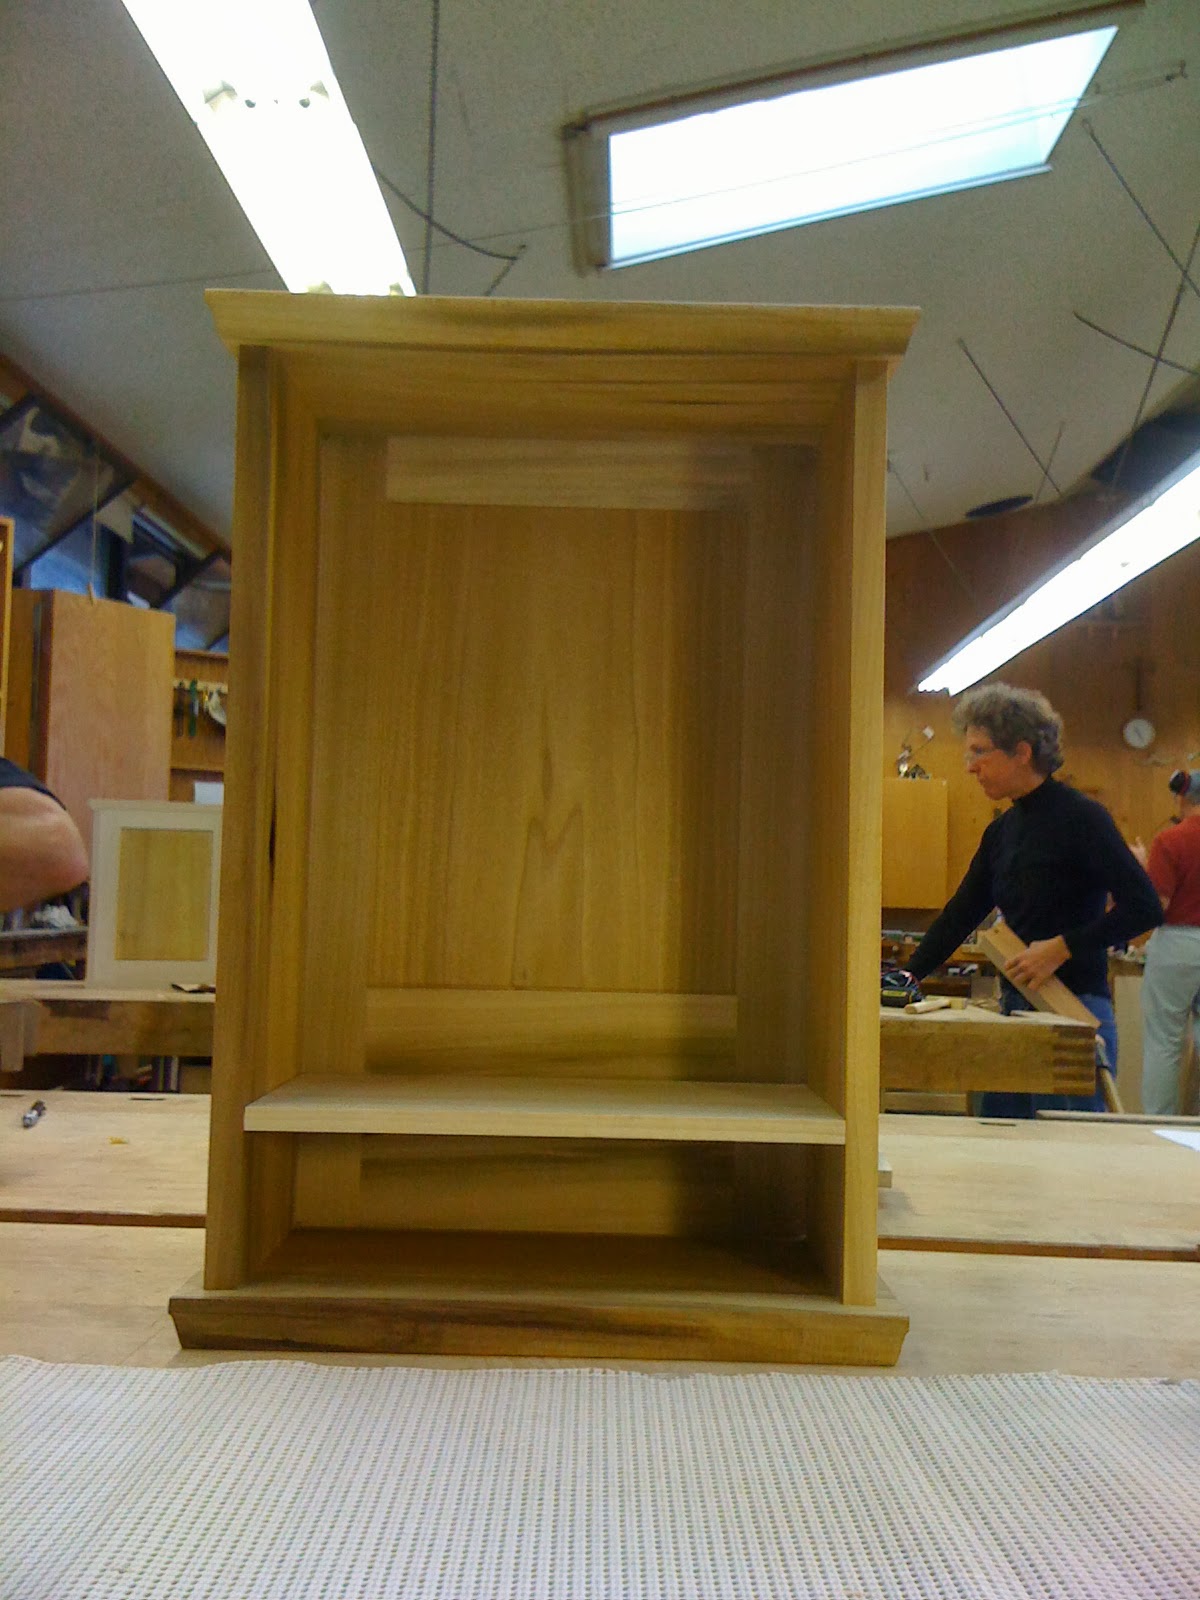
Our last assignment before moving on to our first major project was called the ‘Sow’s Ear’ exercise.
We were given a big chunk of poplar – an inexpensive, generally unattractive wood most people consider to be ‘paint grade,’ and given a list of smaller boards to mill out of the thick, heavy plank.
Then, we surfaced the wood, made our final cuts, and prepared to join the pieces into a cabinet, starting with the frame – essentially two sides and a top and bottom, joined together with dowels.
Once that was done, we constructed a frame-and-panel for the back of the cabinet, and decided on design elements such as shelves and doors. Some students even decided to make drawers.
Essentially, the assignment was meant to pull together a bunch of the skills we had learned, teach us some vital new ones, and give us the experience of building a complete piece from start to finish, before moving on to the real thing.
It was a lot of fun, but also stressful. We’re lucky enough to be enrolled at one of the more esteemed and well-known woodworking schools in the U.S., and the pedigree here is high. A lot of incredible woodworkers have come through here and made names and successful careers for themselves. Most of us want to do that too.
As a result, there’s a general desire among people here to do everything well. Which is where the name of the exercise comes from. Even though this is essentially just practice, many of us stressed over our little cabinets, lost sleep, spent days struggling with certain details. All in an effort to turn a sow’s ear into a silk purse – something we all know is impossible.
But anyway, in the end, though it’s made with cheap, unattractive wood, there’s something about this little creation that makes me happy, looking at it sitting beside my workbench.
Maybe it’s because it represents another step in this journey of becoming a woodworker, and the process of accepting that the struggle towards perfection is sometimes enough.
The final product!

Tuesday, September 17, 2013

Coopering -- Or how flat surfaces become round

I continue to be amazed by what can be done with wood when the proper tools and techniques are used. The latest thing to blow my mind is coopering.
The word comes from the name for barrel-makers because it incorporates some of their techniques for creating curves with wood.
It’s really simple. You figure out the curve you want and sketch it on a piece of paper. Then you take a flat board and mark it out in sections to be cut lengthwise, typically with smaller pieces (they’re called ‘staves’) near the outside, and wider ones in the middle.
Then you cut the staves out of the board, rearrange the pieces along the curve you want. Then you cut the edges of each board on an angle to create the curve, and rejoin them together with glue.
Benchmate Jim glues up his coopered door. The process takes time as only two or three staves can be clamped and glued at a time. The mating edge of each individual piece has been cut on an angle, or bevel, to make the curve.
And boom, you have the rough beginnings of a curve.
Of course at this stage the board is still faceted with the flat surfaces from each of the individual staves, and needs to be planed down with a round-bottom plane on the inside, a smoothing plane on the outside, then scraped and sanded until a perfectly smooth curve is achieved.
Using my round-bottom or coopering plane to turn the flats into curves.

But when it’s complete, it’s a beautiful thing. And when it’s done properly, the boards repositioned so the grain matches up, it almost looks as though it grew that way or was carved out of a solid piece. Amazing!
The finished board, ready to be hung as a door on a small cabinet!


Monday, September 16, 2013

Dovetail joints and other things that come together and become strong


In the old days, cabinetry was actually called ‘joinery,’ because at it’s heart, that’s what it is – putting pieces of wood together in as permanent a way as possible.
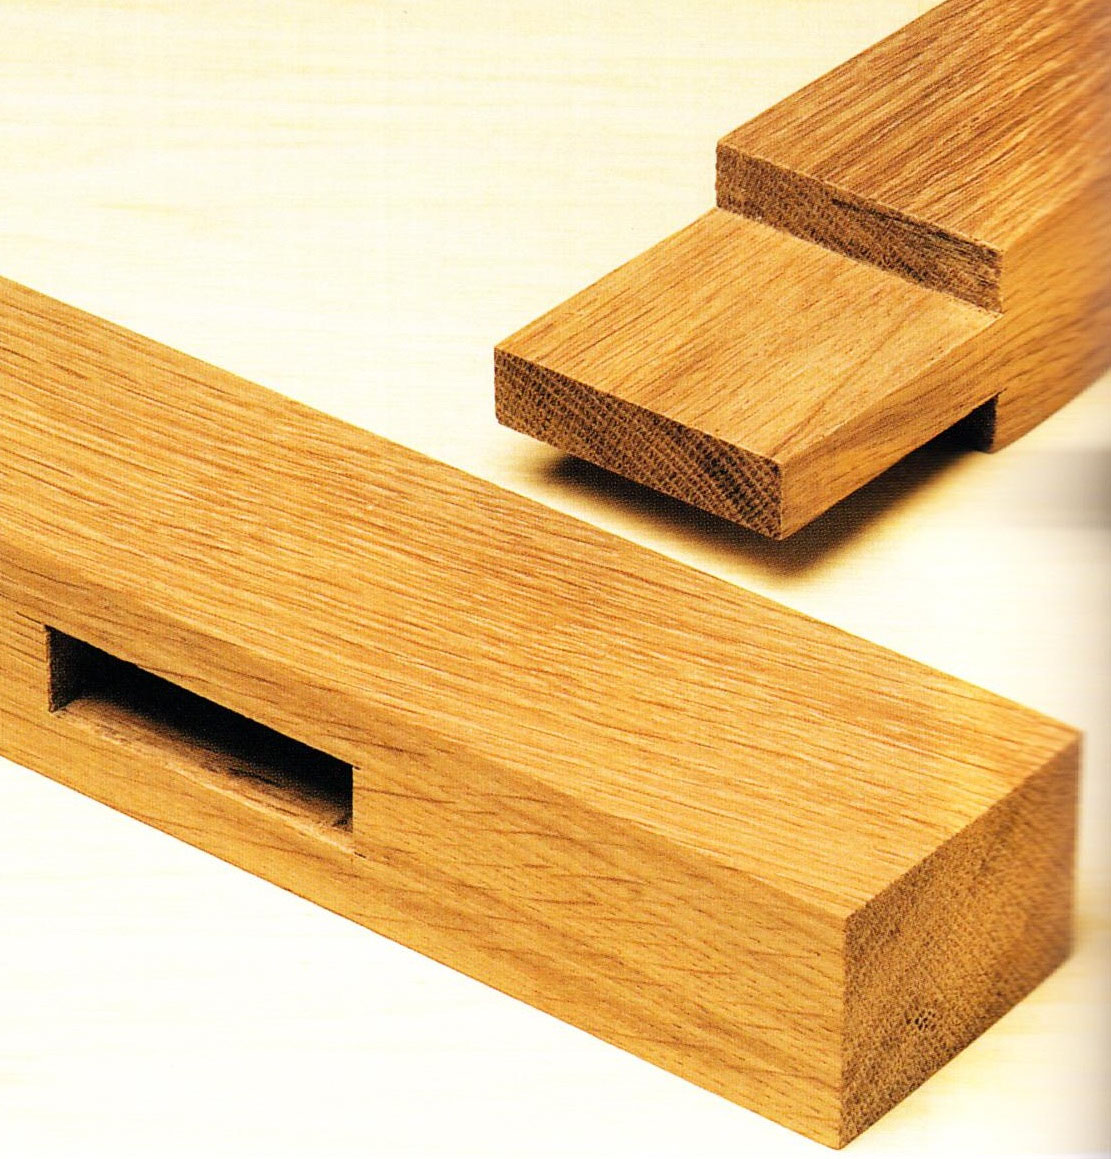
And so we have been learning the fundamentals of that process, beginning with mortise and tenons (through-mortise, haunch-mortise and stop-mortise) – a basic, fundamental joint that looks like this:

A day after that, we had our first lesson on dovetails. And many of us, including myself, slept restlessly the night before. It’s intimidating. Dovetails are simple, yet complicated, fragile, yet incredibly strong when mated, and though many amateur woodworkers claim to be able to make them, few have mastered the skill.
Of course, our instructor Jim Budlong made it look easy, marking out, sawing, then chiseling a set of near perfect dovetails in front of the entire class, in about 20 minutes.
Instructor Jim Budlong demonstrates proper dovetail-technique. True story: He once tried to mess up his dovetails in order to show the class how to fix them -- but accidentally made perfect ones. Amazing.
It took the rest of us, and myself, much longer to get anywhere near acceptable, let alone perfect.
A dovetail joint is considered a ‘mechanical joint.’ It’s called that because two pieces of wood are held together not simply by glue or dowels, but by a series of pins and tails that lock together in such a way that the pressure exerted on them, say in a dresser drawer, actually serves to make the joint tighter over the years, not looser.
But because of that, they are difficult to make, with complicated angles and often dozens of surfaces required to meet perfectly in order for the join to look good.
There’s a reason perfect dovetails are seen as a mark of true craftsmanship, even though they are usually hidden away in the back of a drawer in a cabinet or dresser. When done well, they are sophisticated, beautiful, and add strength and durability to a piece of furniture for decades, even centuries to come.
Done poorly, they can cause fractures or cracks as the two pieces of ill-fitting wood are forced together. If the dovetails themselves are too small, too thin, their strength gives way to fragility. If the dovetails are too large, too evenly spaced, or poorly laid-out, they become clunky and awkward to the eye regardless of how perfectly they were cut.
In the examples we were shown from past years’ students, there is one that was particularly disheartening. A set of dovetails, perfectly cut, fitting together like a glove, were labelled by some heartless instructor as being “too perfect, looks machined.” Unbelievable!
A dovetail, at its best, is not cut on a router jig or by a giant machine in a factory somewhere. Rather, it’s the work of a careful craftsman who cares about little details, such as the size of the pins and the fact the pins on the outside of the joint should be closer together than those on the inside, because there is greater stress.
A craftsman knows these things and takes them into account, and the final product reveals that. A drawer cut by a machine simply doesn’t have the same effect. Or at least that’s what we’re being taught, brainwashed really, as our instructor joked recently.
I’ll take it. The challenge is fun, despite the frustration, and getting it right in the end is so worth the effort.
And the hope is that all these various components of our woodworking education, from sharpening to tool-making, planing and joinery, will all add up and eventually come together, like the two sides of a dovetail joint, and create a firm, long-lasting bond that will only get stronger in the years to come.
Some of my many dovetail attempts!